How To Build a Fence
Brian Reiff has been in the fencing business for most of his life, but if you ask him to build you a fence, he’ll just throw you a bunch of questions.
How To Build a Fence
Brian Reiff has been in the fencing business for most of his life, but if you ask him to build you a fence, he’ll just throw you a bunch of questions.
Brian Reiff has been in the fencing business for most of his life, but if you ask him to build you a fence, he’ll just throw you a bunch of questions.
“The first thing I do is ask what kind of animal the fence will house, how important aesthetics are and how much you want to spend,” says Reiff, owner of Profence, a family-run fencing company in Shippensburg, Pennsylvania. “Most people like the look of a board fence the best,” adds Reiff, “but those can be pricey because they’re so labor-intensive to install.”
—
Labor-intensive, yes, but not terribly complicated. And the good news is that with a few tools and a lot of elbow grease, you can fashion a handsome and durable board fence at a fraction of the contracted rate. Just don’t scrimp on the materials. “Your fence is only as strong as its weakest component,” cautions Reiff. “If your nails rust out, the fence fails even if you’ve got the greatest posts in the world.”
What You’ll Need to Build Your Fence
Tools
Materials
First, map out your fence. Mark the location of the corners as well as any place the fence will change directions. Use a line stretched between the marked points as a guide for where to place the posts, which should be spaced 7.5 feet apart.
Next, dig your holes. Find out what the frost line is in your area, and then dig at least 6 inches below that – usually about 3 feet. To the best of your ability, dig the base of the hole wider than the top or else the frost heave (when soil is lifted out of the ground due to freezing and thawing) will push the concrete plug out of the ground like a splinter. Also, don’t dig more holes than you can fill in a day – an overnight rain can easily undo your hard work.
Now for the posts: Working in batches of 10, set posts in the holes and backfill the holes with concrete, stopping just below ground level (two 50-pound bags per hole should do it). You could do it the long way by buttressing the posts with temporary braces, mixing concrete and packing it in wet, but Reiff offers a time saving fix. He prefers a no-mix quick-set concrete that you pour into the hole and around the post before adding water. Once you’re sure the posts are perfectly vertical left to right and front to back, douse the dry, concrete-filled hole with water, triggering the curing process.
After the concrete has cured – for 48 hours to be safe – your next task will be to tame the posts to a uniform height. For this, reach again for the line. First, cut the corner posts to the desired overall height, then string a line between them, tacking it 1 inch from the top. The line represents where the top rail will intersect each post and should fluidly trace the terrain. If it doesn’t, adjust the placement of the line on the intervening posts. Make a mark where the line hits each post, then use a circular saw to cut at an angle 1 inch above the mark, thereby eliminating a site for water to pool and rot the wood.
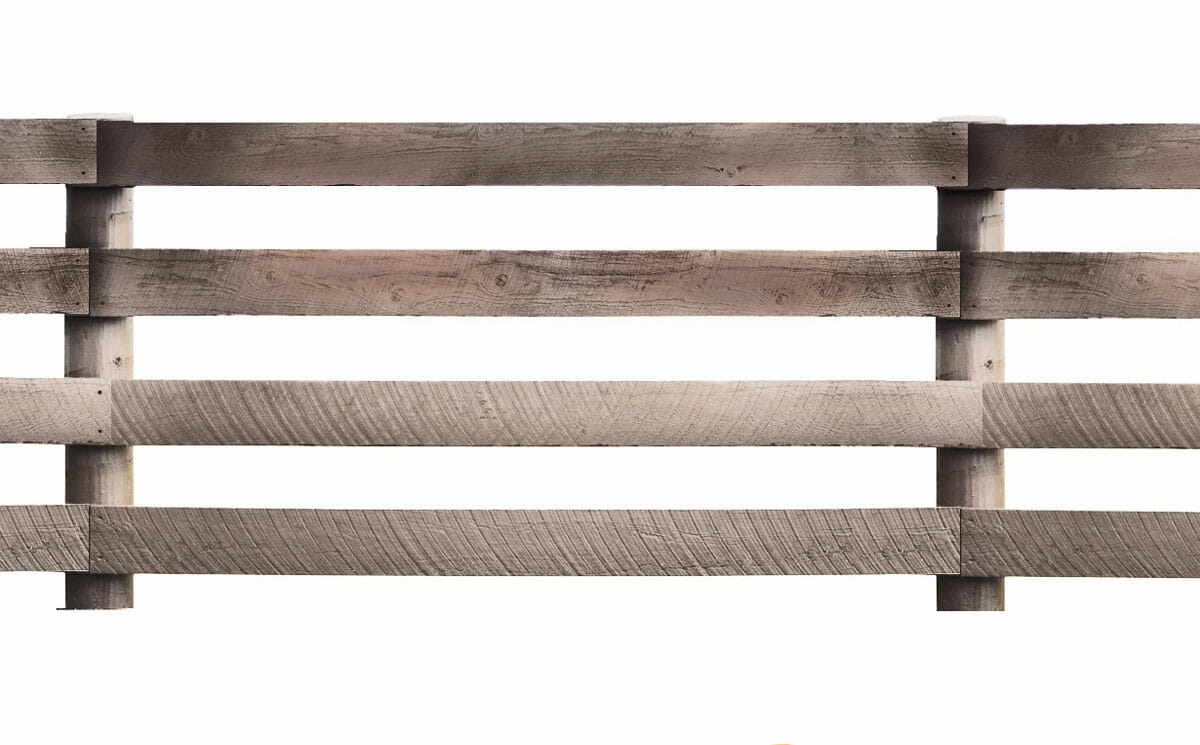
Each 16-foot-long rail will span three posts, but you’ll want to stagger them top to bottom so they don’t always begin and end on the same posts. (Also, by spacing the posts 7.5 feet apart, you’re leaving some wiggle room to cut the rails to size in case a post isn’t perfectly centered in its hole or a measurement is slightly off.) For a fence with three rails, cut one rail in two and use one of the halves to start the middle-rail row. If your fence has four rails, stagger the second and fourth rails the same way. For the strongest fence, place your rails on the inside of the posts. This way, when your mare decides to scratch her back, she’s resisted by concrete-set posts rather than rails fastened only by hardware.
The rails will be secured to the posts at each juncture with either screws (use a screw gun) or ring-shank nails – just be sure they’re galvanized and stay an inch away from the ends of the boards so the wood doesn’t split. Space the rails evenly from top to bottom, but be sure that the bottom rail clears the ground by at least 4 inches to forestall rot and allow for easy mowing.
After the fence is up, take a well-deserved break. You need to wait three to four months before painting it, anyway. “Most likely, the wood you buy is coming straight from the sawmill and is pretty wet, so it won’t absorb the paint well,” says Reiff. In other words, go scratch your DIY itch somewhere else for a while.
Follow us
Republish!
![]()
Republish our articles for free, online or in print, under a Creative Commons license.

This work is licensed under a Creative Commons Attribution-NoDerivatives 4.0 International License.
Want to republish a Modern Farmer story?
We are happy for Modern Farmer stories to be shared, and encourage you to republish our articles for your audience. When doing so, we ask that you follow these guidelines:
Please credit us and our writers
For the author byline, please use “Author Name, Modern Farmer.” At the top of our stories, if on the web, please include this text and link: “This story was originally published by Modern Farmer.”
Please make sure to include a link back to either our home page or the article URL.
At the bottom of the story, please include the following text:
“Modern Farmer is a nonprofit initiative dedicated to raising awareness and catalyzing action at the intersection of food, agriculture, and society. Read more at <link>Modern Farmer</link>.”
Use our widget
We’d like to be able to track our stories, so we ask that if you republish our content, you do so using our widget (located on the left hand side of the article). The HTML code has a built-in tracker that tells us the data and domain where the story was published, as well as view counts.
Check the image requirements
It’s your responsibility to confirm you're licensed to republish images in our articles. Some images, such as those from commercial providers, don't allow their images to be republished without permission or payment. Copyright terms are generally listed in the image caption and attribution. You are welcome to omit our images or substitute with your own. Charts and interactive graphics follow the same rules.
Don’t change too much. Or, ask us first.
Articles must be republished in their entirety. It’s okay to change references to time (“today” to “yesterday”) or location (“Iowa City, IA” to “here”). But please keep everything else the same.
If you feel strongly that a more material edit needs to be made, get in touch with us at [email protected]. We’re happy to discuss it with the original author, but we must have prior approval for changes before publication.
Special cases
Extracts. You may run the first few lines or paragraphs of the article and then say: “Read the full article at Modern Farmer” with a link back to the original article.
Quotes. You may quote authors provided you include a link back to the article URL.
Translations. These require writer approval. To inquire about translation of a Modern Farmer article, contact us at [email protected]
Signed consent / copyright release forms. These are not required, provided you are following these guidelines.
Print. Articles can be republished in print under these same rules, with the exception that you do not need to include the links.
Tag us
When sharing the story on social media, please tag us using the following: - Twitter (@ModFarm) - Facebook (@ModernFarmerMedia) - Instagram (@modfarm)
Use our content respectfully
Modern Farmer is a nonprofit and as such we share our content for free and in good faith in order to reach new audiences. Respectfully,
No selling ads against our stories. It’s okay to put our stories on pages with ads.
Don’t republish our material wholesale, or automatically; you need to select stories to be republished individually.
You have no rights to sell, license, syndicate, or otherwise represent yourself as the authorized owner of our material to any third parties. This means that you cannot actively publish or submit our work for syndication to third party platforms or apps like Apple News or Google News. We understand that publishers cannot fully control when certain third parties automatically summarize or crawl content from publishers’ own sites.
Keep in touch
We want to hear from you if you love Modern Farmer content, have a collaboration idea, or anything else to share. As a nonprofit outlet, we work in service of our community and are always open to comments, feedback, and ideas. Contact us at [email protected].by Dina Rudick, Modern Farmer
April 10, 2014
Modern Farmer Weekly
Solutions Hub
Innovations, ideas and inspiration. Actionable solutions for a resilient food system.
ExploreExplore other topics
Share With Us
We want to hear from Modern Farmer readers who have thoughtful commentary, actionable solutions, or helpful ideas to share.
SubmitNecessary cookies are absolutely essential for the website to function properly. This category only includes cookies that ensures basic functionalities and security features of the website. These cookies do not store any personal information.
Any cookies that may not be particularly necessary for the website to function and are used specifically to collect user personal data via analytics, ads, other embedded contents are termed as non-necessary cookies.
This is probably a really simple / obvious question, but with the rails on the inside of the posts what happens at the corners, with the rails at the same height they can’t both go to the inside of the post
Stupid question but when you say 7.5 feet apart is that from the center of the post or from edge to edge
Probably a very basic or apparent question, but what happens at the corners when the rails are inside the posts? If the rails are the same height, they can’t both fit inside the post.
Have smaller pieces of ground near busy county highway. Used 2 have bar there. Need fencing around perimeter 2 keep everyone out. Everything from motor bikes 2 semi truck turns around here. There’s no other places along this stretch of rd where it can be done easily. Is in direct sun all day so am putting garden in. DON’T WANT PEOPLE USING THIS ANYMORE!!!!!Plus we have 2 dogs that just gotta investigate every person that does this. It’s a major problem.
Good read!! Such a detail article.
Hi there, You’ve done an excellent job. I’ll certainly Digg it and personally, recommend to my friends.
Well, this guide certainly makes building a fence a lot easier than I thought it would be. I might have to actually try it myself next spring 🙂
Thank you for share you experiences with us to make lot easier build fence
great
Great advice thanks. If you have dogs a good idea is to nail chicken wire or pig wire to the fence.