Modern Farmer How-To: A Better Way to Build a Raised Bed
By Brian Barth
on April 12, 2018
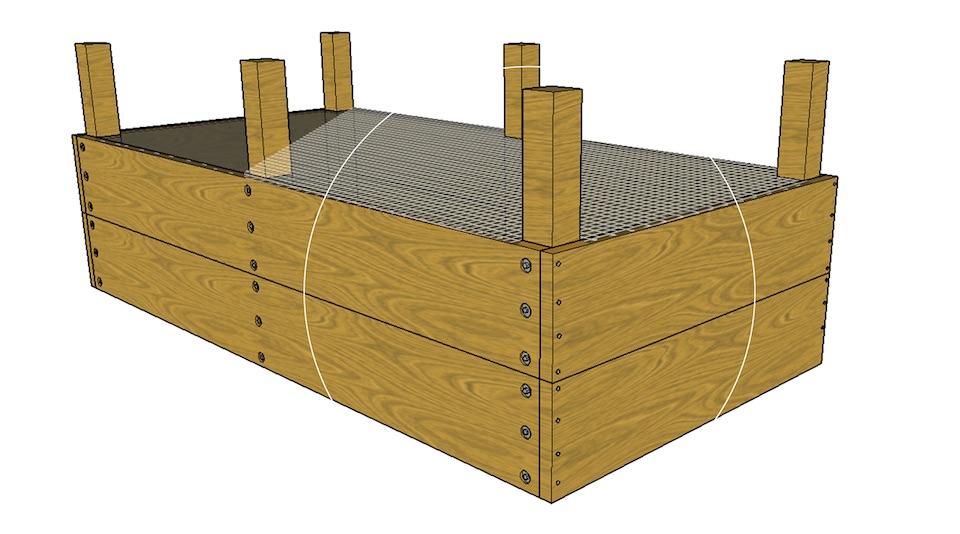
This blinged-out box takes vegetable growing to new heights.

[mf_list_sidebar layout=”basic” bordertop=”yes” title=”Materials” separator=”no”]
Six 8′-long cedar 2x12s
Two 10′-long cedar 4x4s
Three 10′-long cedar 2x8s
One 4’x10′ roll of 1/2″ hardware cloth
One 20′ roll of 8″ copper flashing
One 4’x25′ roll of landscape fabric
One 1-pound box of 3″ exterior-grade wood screws
Thirty-six 3/8″ galvanized washers
Thirty-six 3/8″x3″ galvanized lag screws
One box of 1/2″ galvanized heavy-duty staples
One 1-pound box of 3/4″ galvanized roofing nails
One 25′ roll of 1/2″ drip tubing
One 1/2″ compression T fitting
Four 1/2″ compression elbow fittings
Two 1/2″ compression valves
Fourteen 1/2″ galvanized metal pipe straps
One 1-pound box of 3/4″ exterior-grade wood screws
Three 60-pound bags of concrete mix
[/mf_list_sidebar]
But, oh, the payoff! Crafted of long-lasting cedar, this beauty deters both weeds and tunneling rodents, thanks to its landscape-fabric and hardware-cloth underpinnings. A strip of copper flashing repels slugs, while a few simple components – drip tubing, pipe straps – render the whole shebang ready for drip irrigation and hoop-house fittings. And at two feet tall, it accommodates plenty of productivity-boosting soil and a ledge that doubles as a back-saving bench. Sold? Let’s get started.
[mf_h2 align=”left” transform=”uppercase”]TOOLS[/mf_h2]
Leather work gloves
Protective eyewear
Tape measure
Circular saw*
Carpenter’s speed square
Tin snips*
Scissors
Power drill with assorted bits
Ratchet with a 9/16″ socket
Staple gun
Hammer
Post-hole digger
[mf_h2 align=”left” transform=”uppercase”]PREP THE MATERIALS[/mf_h2]
Using the circular saw*, cut the 2x12s into four 4′-long pieces and four 7’9“-long pieces; cut the 4x4s into six 3′-long pieces; and cut the 2x8s into two 4’41/2“-long pieces and two 8’41/2“-long pieces. Using the speed square, cut the ends of the 2x8s at 45-degree angles so that the ends of the shorter and longer pieces will fit together, as shown opposite, top left and bottom. Using tin snips*, cut the hardware cloth to an 8′ length and cut the flashing into two 4“x 20′ pieces. Using scissors, cut the landscape fabric into two 4’x 12.5′ pieces.
[mf_h2 align=”left” transform=”uppercase”]BUILD THE WALLS[/mf_h2]
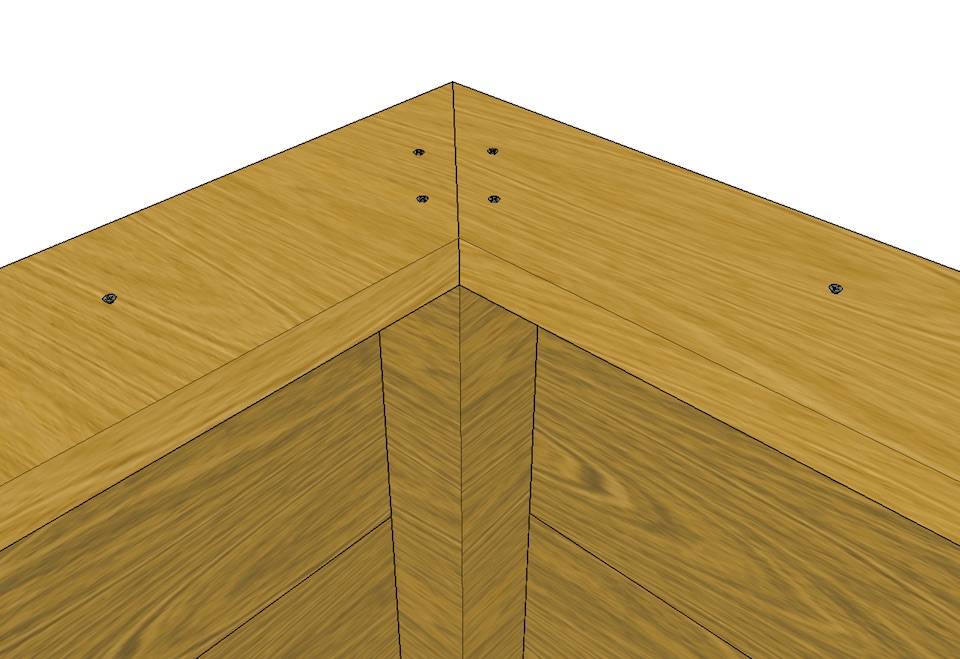
Assemble two of the shorter 2x12s with two of the longer ones to form a 4’x 8′ rectangle, attaching the boards at each corner with four evenly spaced 3” wood screws, as shown below. Repeat with the remaining 2x12s to form a second, identical rectangle, and stack this one atop the first.
[mf_h2 align=”left” transform=”uppercase”]ATTACH THE POSTS AND HARDWARE CLOTH[/mf_h2]
Using the diagram below as a guide, brace a 3′-long 4×4 inside one corner of the bed, and drill three 15/64” pilot holes through each of the longer 2x12s and into the 4×4 post, so that the holes are evenly spaced on each 2×12 and centered on the post, extending about halfway into the latter. Remove the post and expand the holes in the 2x12s with a 3/8” bit. Then expand those holes again with a 11/4” bit, but only to a depth of 3/8” (thus allowing you to countersink the washers and screwheads). Reposition the post, put a washer on each lag screw, and use the ratchet to drive the lag screws into the holes. Repeat to install posts in the other three corners, as well as at the midpoints of the longer 2×12 walls. Next, attach the hardware cloth, stapling its outer edges atop the walls at 4-inch intervals and using the tin snips to cut the cloth to fit around the posts. Before adding the accoutrements, flip the bed over so it’s standing up on the 4×4 posts.
[mf_h2 align=”left” transform=”uppercase”]ADD THE ACCOUTREMENTS[/mf_h2]
The Bench
Position the 2x8s atop the walls, as shown at left, so that the angled ends fit together to form a rectangle and the rectangle’s interior edges are flush with the interior edges of the posts. Secure the bench to the walls with 3” wood screws, spaced 12 inches apart, plus two additional screws in each post.
The Copper Flashing
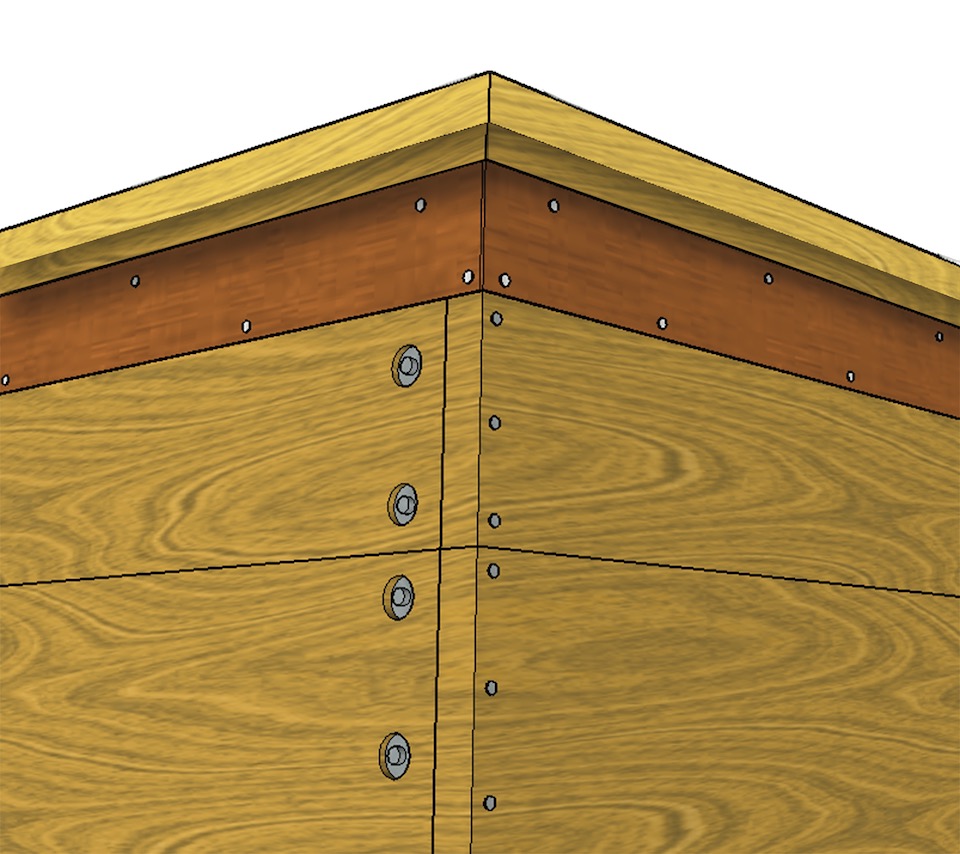
Wrap the copper pieces around the exterior of the bed, just below the bench, so that one piece overlaps the other slightly to form a continuous band, creasing the material at the corners and removing the excess length with tin snips. Attach using galvanized roofing nails spaced 8 inches apart in a zigzag pattern (as shown above).
The Irrigation Setup
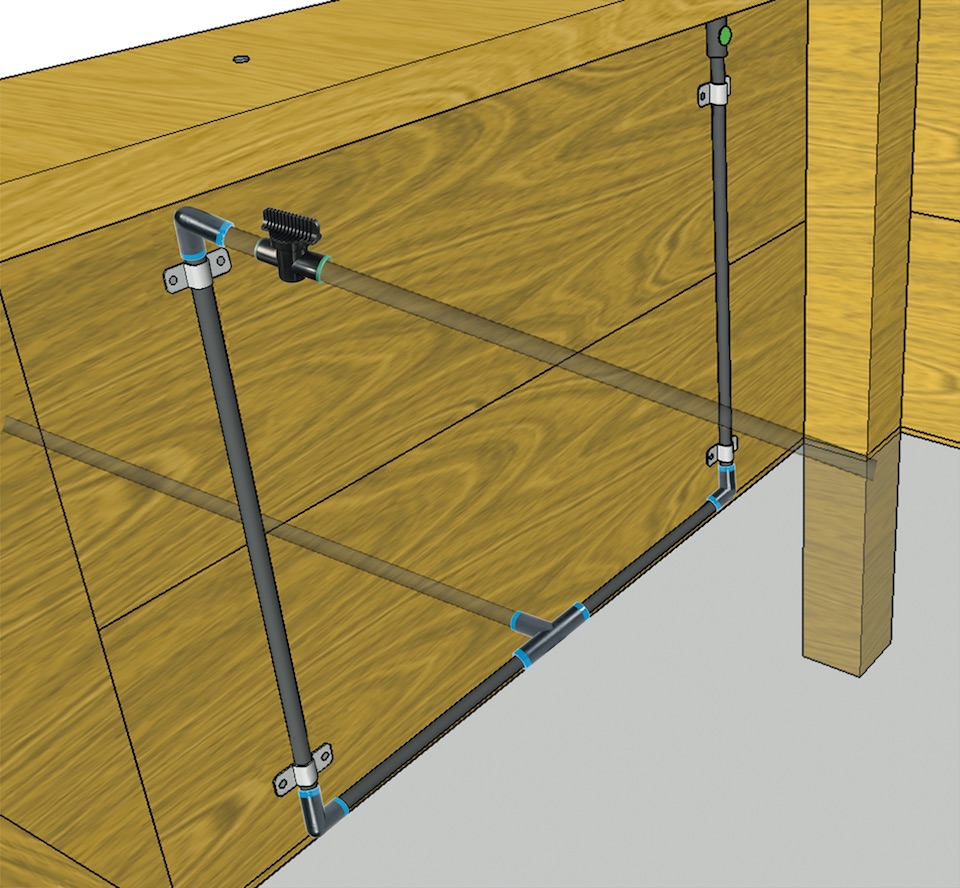
Using the diagram below as a guide, drill a 3/4” hole at the midpoint of one of the shorter walls, about an inch from the bottom. Run drip tubing through the hole from the outside, installing a T fitting to the end of the tube just inside the bed. Attach a 12” length of tubing to either side of the T fitting, then attach elbow fittings to the exposed ends of both 12“-long tubes. Run another length of tubing from each elbow fitting to just below the bench, then attach 2 more elbow fittings to the exposed ends of these tubes. Connect a valve to each of these upper elbow fittings with a short piece of tubing. Using 4 pipe straps and 3/4” wood screws, secure the vertical tubing to the wall just below the upper elbow fittings and just above the lower ones.
The Hoop-House Setup
Use 3/4” wood screws to attach the remaining pipe straps at 21-inch intervals along the interior of the bench’s longer sides, as shown below. These straps will enable the quick addition of PVC hoops and clear plastic sheeting for a season-extending mini-greenhouse.
[mf_h2 align=”left” transform=”uppercase”]INSTALL THE BED[/mf_h2]
Create a level, vegetation-free site that measures at least 5′ x 10′ and receives at least 6 hours of direct sunlight a day. Employing several helpers, position the bed on the site, mark the location of the 6 posts, and remove the bed. For each post, dig a 6“-diameter hole that’s 14” deep. Cover the site with landscape fabric, overlapping the pieces lengthwise by 12” in the middle, then use scissors to cut holes for each of the posts to pass through. Move the bed back into position and lower the posts into their holes. Fill the remaining space in each hole with dry concrete mix to within 3” of the top. Fill each hole the rest of the way with water. Once the water has saturated the concrete mix, fill the remaining space in the holes with soil. Spread mulch to conceal the landscape fabric in the area around the bed.
*Power saws can cause serious injury. Follow the safety instructions in your owner’s manual and wear protective gear when operating. Don heavy leather gloves when handling the tin snips, hardware cloth, and copper flashing.
Mmmm