How to Build a Hoop House
By Anita B. Stone
on January 15, 2015
If you dread the cold winter frost, never fear: You can extend your growing season without too much muss and fuss. Sometimes called a hoop tunnel, a plastic hoop house insulates your plants and keeps frost at bay.
And you don't have to be an engineer to build one!

There are a few ways to build a hoop house. Possibly the easiest is to place metal stakes into the ground and slide six-foot sections of PVC pipe over the plants, creating an arch effect. Then, simply stretch plastic over the hoops and you’ll protect your plants from freezing temperatures and frost. You won’t need to pre-train or harden them off because plants will have grown accustomed to colder outside temperatures during the fall season. The hoop house also warms the soil for spring seedlings and protects sensitive plants during the cold season.
Prices for an easily built plastic enclosed hoop house fall well below the costs of other greenhouse structures. You can assemble the hoop house in just a couple of hours at a cost of approximately $1 or less per square foot.
To build one is a fairly simple task. It can be either freestanding and portable or part of a raised bed garden, using three or four hoops per bed. I recommend purchasing supplies for five beds with four hoops per bed (can be found at Lowe’s or other home garden stores):
.5-inch x 10-foot 315 PSI SDR 13.5 PVC pipe
.5-inch rigid straps
Common 0.375 inch x 2 foot rebar pins
One box of #6 x 1.25 inch countersinking-head polymer-coated Phillips deck screws
Blue Hawk 10-foot x 100 foot x 2 millimeter clear construction Plastic film
One set of spring clamps for plastic ”“ (I suggest the Irwin 14-piece Plastic Spring Clamp Set)
One hammer
One steel tape measure
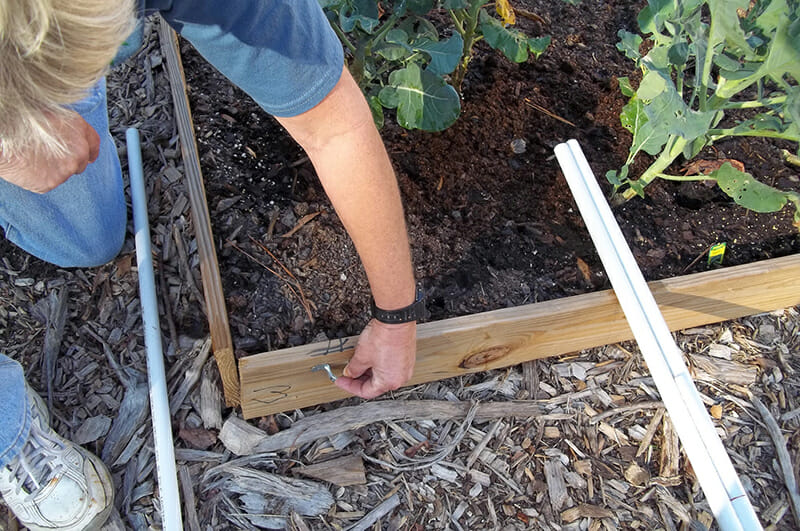
Placing bracket onto wood frame.
[mf_h5 align=”left” transform=”uppercase”]Step 1[/mf_h5]
Decide on an area of level ground and measure a 4 foot x 6 foot or 6 foot x 8 foot bed, made of wood, brick or other material that is secure to the ground.
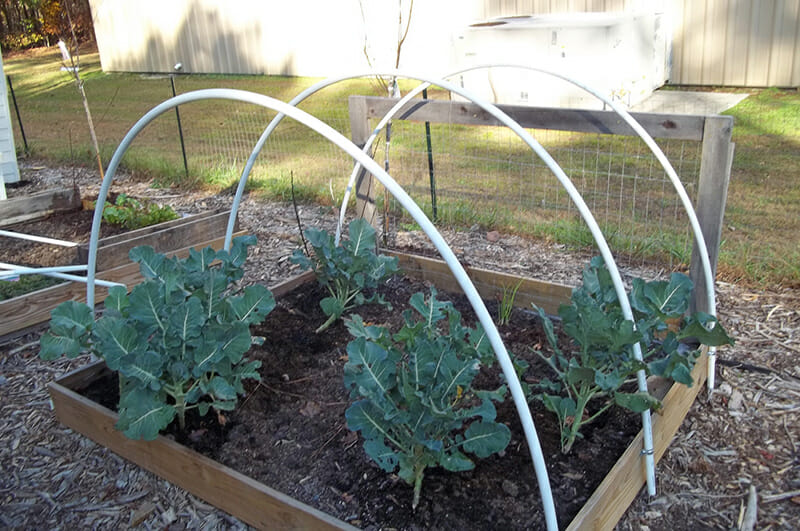
Three hoops complete one hoophouse for crop plantings.
[mf_h5 align=”left” transform=”uppercase”]Step 2[/mf_h5]
Insert small rebar into the ground on both sides to secure the pipe. You can easily fit the pipe onto the rebar for stability. If using a garden bed, screw a clamp on each side of the front of the bed, then fit the polypipe through the opening of the clamp, then tighten. Do this procedure three or four times along each side of the bed. Pipes are flexible, sturdy and can be dismantled and reassembled each year — and maneuvered by one person without the use of power tools.
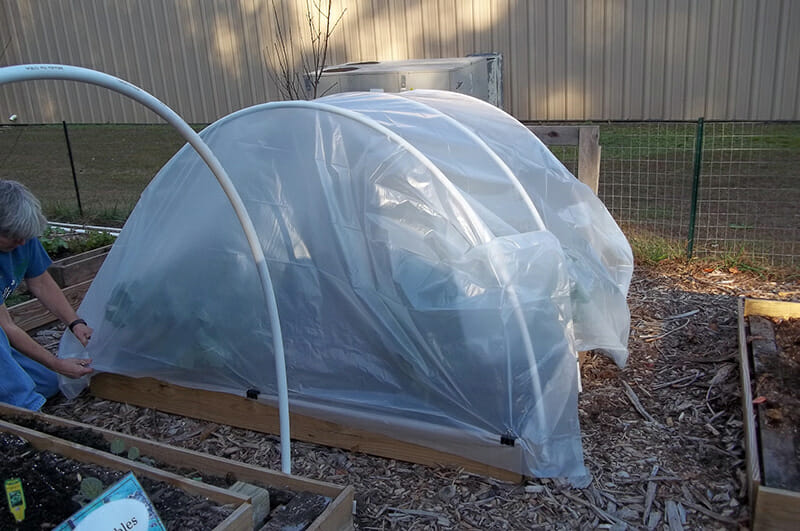
Plastic film covering hoop house for seasonal protection.
[mf_h5 align=”left” transform=”uppercase”]Step 3[/mf_h5]
Once the hoops are in place, plant the crops you wish for the upcoming season. To keep them from freezing, cover the entire area with the plastic.

Plastic cover protects plants from any inclement weather, rain, wind and UV rays.
[mf_h5 align=”left” transform=”uppercase”]Step 4[/mf_h5]
Use spring clamps to secure the plastic cover for the hoop area from front to back and side to side. Make sure the plastic covers the entire hoop area, from front to back. This unheated tunnel of plastic directly over the soil, whether knee-high or large enough for a person to work inside, makes year-round harvesting possible. It withstands snow, keeps frost and dew off and offers protection from hungry animals, in addition to blocking excessive rain and wind. It also raises daytime temperatures and reduces exposure to UV rays.
You can build several hoop houses for under $300. It’s just plain fun and good sense to grow crops during the cold weather, producing high yields for yourself and your family without exposing yourself to the elements.
Before I got the knack of it, I found myself hammering my thumb when I tried to nail the plastic onto the wood. Another thoughtless plan was when I picked a windy day and was chasing plastic across my yard as it escaped like a string-less kite before I was able to secure it with the latches. Fun and laughter were a major part of the process and in the end it was worth the few bruises which will heal and the broken fingernails which will grow back for the lessons learned for the next hoop houses I will build.
Great help! Thanks. Thinking the plastic could be replaced by polyester row cover in hot weather, basically as an insect shield.
I would like to use a hemp screen for the hoop garden. Do you know what kind I should buy and where to get it. Does the plastic you use break up in small pieces under hot sun and cold winter weather?
What is the clearance for the plants?
I like that fence around your raised bed. Looks like it has some type of edge on the top Where can I find a fence like that? I looked in the local hardware store but no luck. Appreciate if you can provide some information on that.
I’m interested in starting a farm to table business and I basically want to grow Herbs for my daughters catering business
Hoop houses are a great idea one that I will use in Spain once I retire. I love gardening and fresh fruits and vegetables.
great idea; most practical&economical