How to Build a Solar Dehydrator
A person can only pickle so much. This project provides an off-the-grid way to preserve bushels of seasonal bounty.
Frustrated by nonelectric dehydrators that didn’t function in their humid climate, Walk decided to test her “hot tin roof ” theory: She spread a bunch of produce on a window screen, covered it with black cloth, weighted it down with a storm window, and set the whole shebang atop their home’s metal roof. The “aha!” results led the duo to devise more formal, and popular, plans for their Radiant Super Dryer. We simplified the design to fit standard materials, so anyone with basic carpentry skills can construct this DIY dehydrator in a single weekend. Use it to dry not only fruits and vegetables, but also mushrooms and herbs. When you’re finished, get tips on how to put your DIY dehydrator to best use.
MATERIALS
One 4′ Á— 2′ piece of 28-gauge sheet metal (steel or aluminum)
One can (12 ounces) black BBQ-grill spray paint
Three 8′-long cedar 2Á—2s
Two 8′-long pressure-treated 2Á—4s
One 8′ Á— 26”³ sheet of corrugated galvanized metal roofing
One 25-pack of 3”³ exterior-grade wood screws
One 4′ Á— 2′ feet of clear polycarbonate
One 80-pack of 1”³ roofing screws with rubber washers
One 40-pack of 1”³ steel flat-head sheet-metal screws
One 4′ Á— 2′ food-grade stainless-steel screen
One box of â…œ”³ stainless-steel staples
One tube (2.8 ounces) of squeezable silicone caulk
Two 6”³ heavy-duty galvanized “T” hinges
One 5”³ galvanized gate hasp
Two 16”³ Á— 8”³ Á— 6”³ blocks
TOOLS
Circular saw*
Tin snips*
Power drill with assorted bits**
Staple gun
INSTRUCTIONS
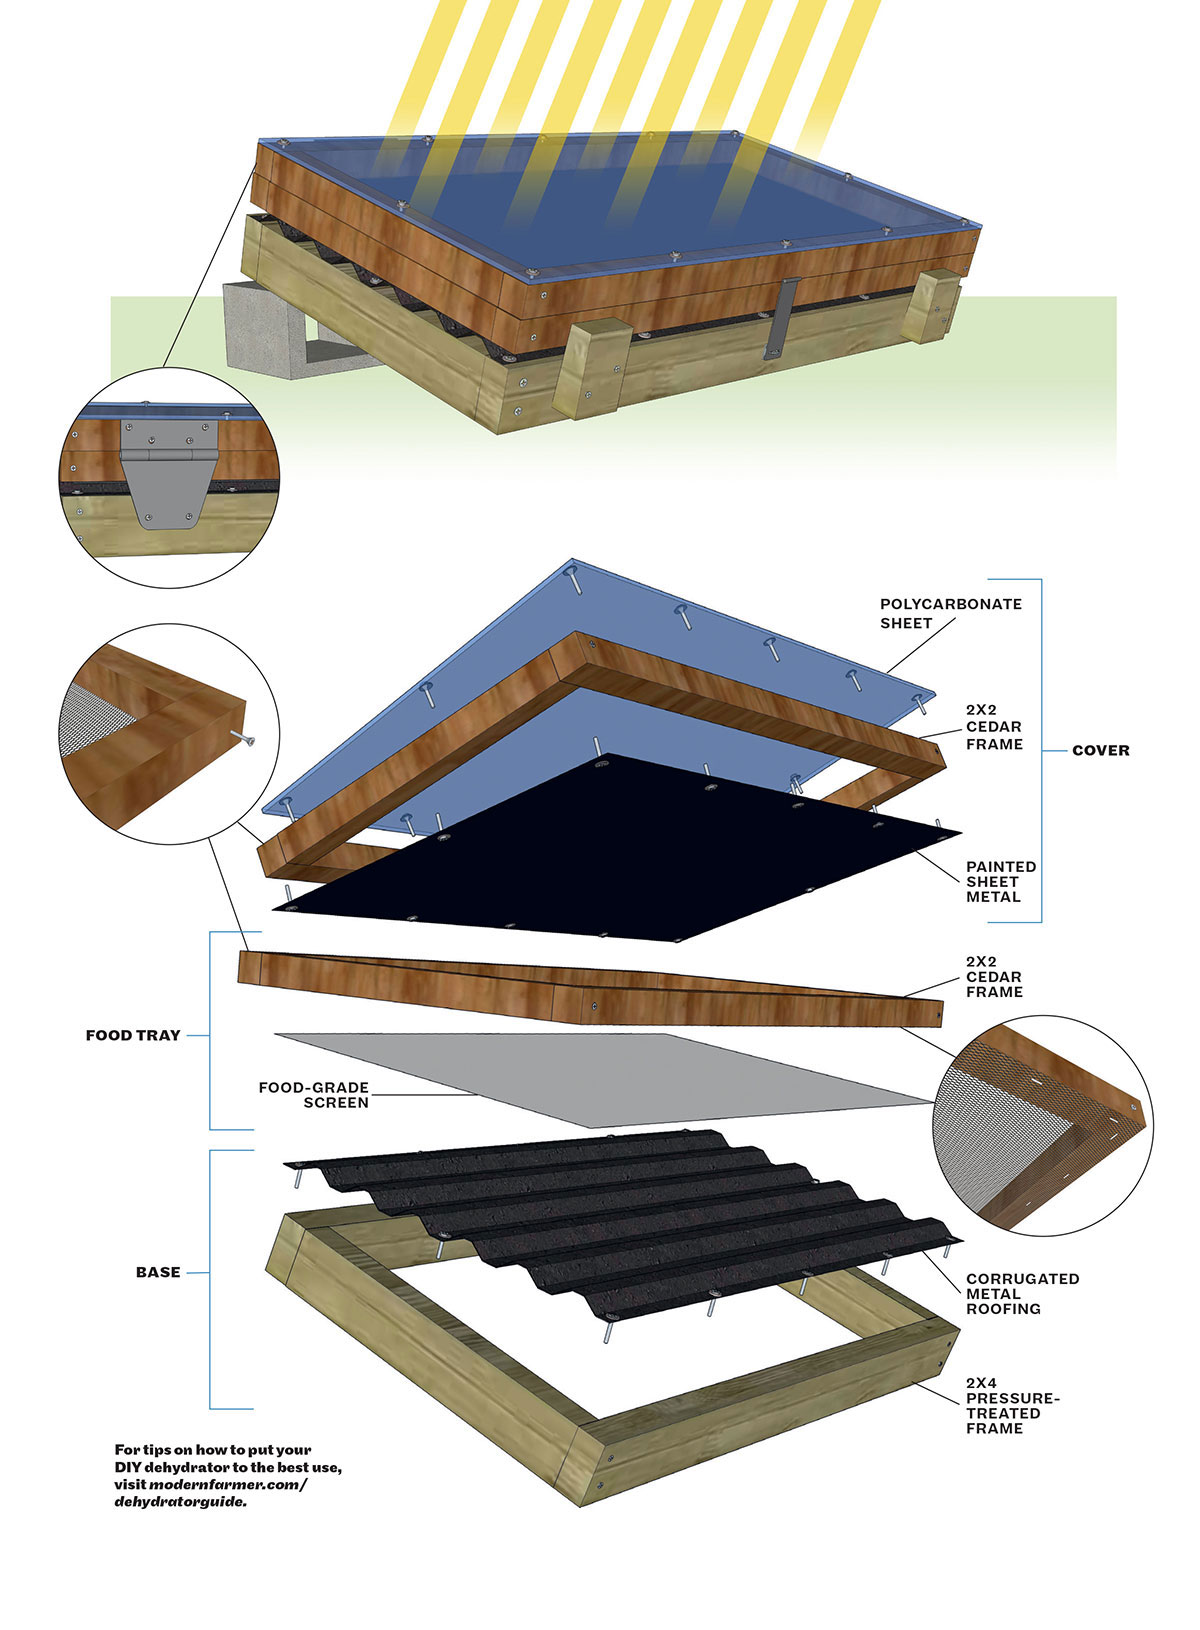
PREP THE MATERIALS. Spray both sides of the sheet metal with 2 coats of the paint; let dry for 24 hours. Using the circular saw*, cut the cedar 2Á—2s into four 48”³-long pieces and four 21”³-long pieces, then cut the pressure-treated 2Á—4s into two 48”³-long pieces, two 21”³-long pieces, and two 5”³-long pieces. Employ the tin snips to cut the sheet of corrugated metal roofing down to 48”³Á— 24”³.
BUILD THE FRAMES FOR THE COVER, FOOD TRAY, AND BASE. Arrange two 48”³-long and two 21”³-long cedar pieces so they form a flat 48”³Á— 24”³ rectangular frame, with the shorter pieces sandwiched inside the longer ones; attach using a wood screw** at each corner (as shown). Repeat with the remaining cedar pieces to build a second, identical frame. Repeat once more, but with the 48”³-long and 21”³-long pressure-treated pieces and 2 wood screws at each corner, to build a third frame.
MAKE THE COVER. Place the polycarbonate sheet atop one cedar frame, aligning their edges, and attach with 12 roofing screws** and rubber washers, spaced 1′ apart (as shown). Flip the frame over, and repeat to attach the sheet metal to the frame’s other side, this time using sheet-metal screws**.
MAKE THE FOOD TRAY. Place the food-grade screen atop the other cedar frame, aligning their edges. Using the staple gun, attach each corner with 2 staples (as shown), then staple along the screen’s outer edges, every 6 inches. Flip the frame over and seal the inside edge where the screen meets the frame with silicone caulk; allow to set 24 hours before putting food on the tray.
MAKE THE BASE. Place the corrugated metal roofing atop the pressure-treated frame, aligning their edges, and attach with 12 roofing screws and rubber washers, spaced 1′ apart (as shown).
ASSEMBLE THE DEHYDRATOR. Stack the food tray (screened surface facing down) atop the base, and the cover (sheet-metal surface facing down) atop the food tray, aligning the edges of all three components. Decide which 48”³-long side of the assembled stack will form the back of the dehydrator. Position the two “T” hinges on this back side, spaced 4 inches in from the corners, and attach only to the base and the cover with sheet-metal screws**. Center the hasp on the front side, and attach only to the base and the cover with sheet-metal screws**. (The food tray should remain detached for easy removal and cleaning.) Position the two 5”³-long pressure-treated pieces vertically on the front side of the base, spaced 4 inches in from the corners, and attach with wood screws**. These pieces will prevent the food tray from sliding forward when the back of the dehydrator is raised atop the cinder blocks to help it take full advantage of southern exposure.
*Power saws can cause serious injury. Follow the safety instructions in your owner’s manual and wear protective gear when operating. Don heavy leather gloves when using tin snips.
**Cedar is prone to splitting and cracking. Prevent this by drilling pilot holes into the wood so it can safely accept screws.


The supply list is not within the type format for the website. I can’t read the dimensions.
Very powerful idea. Enlighten more cos i tried but it failed
A source for food grade screen that is at least 16″ wide?
Except for the glitch with the dimension punctuation, this is a clean, succinct presentation of the best dehydrator design for humid climates. Thank you for posting. We are building another dehydrator now, and your version informs ours. Such a fantastic low-tech tool!!
I noticed you oriented the roofing metal with grooves in the long dimension, but then show the completed assembly with a horizontal configuration. I imagine that the humidity venting works even better when positioned vertically, though the vertical position does mean that the heat grows intense towards the top, and unless the food is moved down as it dries, it can actually crisp or toast!
I am a traveller and live out of a very small car, camping as I go. I use a bamboo tray which I put on the dashboard a I drive. Very good that is. When camping, I use the same tray but cover it with a thin scarf to keep the flies at bay. that’s my DIY drier ^^