How to Graft a Tree Using the ‘Whip and Tongue’ Method
Join two plants together as a way to grow hardier trees and accelerate the fruiting process.
Spring has sprung and that’s good news for gardeners who’ve been eager to dig into the soil once again. If you’re one of the few who’s added fruit trees to your crop list, there’s one practice you may want to think about integrating this season: grafting.
Why would you want to graft a tree? Some varieties of fruit have better root systems and some have better fruits. Grafting allows you to combine the two into one plant. You fuse a branch of a desired fruit tree—apple, pear, cherry or plum, for example—to a healthy, hardy rootstock.
Grafting helps strengthen a tree’s resistance to certain diseases and allows a tree to adapt to growing in non-native soils or environmental conditions. It’s also utilized to repair injured trees.
In general, grafting is a preferred alternative to growing trees from seed. The technique helps finicky varieties grow successfully. It also ensures the tree will produce fruit that is “true to seed” or an identical genetic copy. Apple seeds, for example, grow genetically different trees than the tree that produced the apple. In order to grow more Granny Smith or Pink Lady apples, the grafting process is necessary.
You’ll also get to harvest fruit quicker. On average, a grafted tree will start to sprout fruit three to five years earlier than if growing from a seedling.
If you’re new to the grafting game, we suggest starting with apples, as they have a reputation for being beginner friendly. Check out our Guide to Types of Apples for inspiration.
Once you’ve got your grafting game down, try making something called a combination tree, which consists of one tree grafted with branches that produce several different crop varieties.
The Whip and Tongue Grafting Method
There are several different ways to graft a tree, but the “whip and tongue” method is one of the most widely adopted techniques. Before getting started, there are a few terms worth familiarizing yourself with.
Rootstock: The tree or branch of the parent tree you are starting with.
Scion: Your cuttings or wood that will be grafted to your rootstock.
Cambium layer: This is the greenish layer of stem tissue between the outer and inner bark. It’s the magic material that actively divides and produces new cells, and it is what’s needed to match up between the two plants for grafting to occur. All growth above this union retains the identity of the scion, and all growth below retains the identity of the rootstock.
What you need
—A grafting or bevel knife (make sure it’s sharpened before you make your cuts)
—Pruning shears
—Tape (grafting tape is best, but electrical tape is also fine)
—Rootstock (or a parent tree)
—Scion wood
—Clean gloves
Initial tips to increase grafting success
Wait at least a year or two before grafting a tree if you’ve planted it as an adult tree. This will allow time for the tree to adjust to its environment.
Pick rootstock and scion crops that grow in your local area, so you’re not left guessing whether they’ll be able to fare in current or future conditions. Ask your local nursery or extension officer for recommendations.
Graft plants from the same species (apple scion on apple rootstock, cherry scion on cherry rootstock, etc.).
Ensure all your cutting materials are sterilized to minimize the chance of an infection.
Where to source scions
Some gardeners will swap scion wood with friends, but if you don’t have a parent tree and scion candidate readily available, many nurseries or orchards will sell you these materials in person or online.
If you’re new to this and you’re shopping for a parent tree, ask for clonal rootstock. For those interested in online scion swaps with fellow grafters, check out this link here.
If you’re going out to collect your scion wood from existing trees, it’s best to do this when the plant is still dormant in the early spring. This ensures that it doesn’t begin growing before it’s attached to the rootstock.
Collect wood that is less than a year old. Look for branches that are straight, less than a diameter of a pencil (one quarter to one half of an inch) and with limited to no side branching.
When you cut your branch, ensure it’s around 12 to 18 inches long. Use a sterilized knife or shears to do this to prevent infection.
Storing scions
Put the scions in the fridge in Ziploc bags to prevent them from getting warm and drying out. This will also help them maintain dormancy. Label them with the name of the tree and the date that the cutting was made. Wherever you store these cuttings inside your fridge, remove any fruit in close proximity. This is because certain fruits can produce ethylene as they ripen, which can kill the wood.
According to experts from the University of Missouri’s pest management program, temperatures lower than 0°F can injure the buds on your scion, but temperatures warmer than 32°F will shorten the storage life of the scion wood. Make sure your storage temperature strikes between these two thresholds.
Ideal conditions for grafting
If fruit trees in your neighborhood have buds that are starting to open, this means the tree’s sap has started to flow throughout the branches. This is the perfect time for grafting because, with sap flow, there are better chances for the two branches to bond, minimizing conditions for the scion to dry out.
The grafting process
1. Use your shears to clip a branch off of the rootstock. Make sure this branch is clean and there are no tears in the outer layer of the wood. When you make that cut, you will see a lighter, greenish wood—this is your cambium layer.
2. Be sure to wear clean gloves during this process. Do not ever touch the cambium layer with your bare hands. The oil from your hands will kill the cells that are exposed and ruin your chances of bonding.
3. Using a knife, make a long, straight, sloping cut, about two to three inches long. Place your flat side of the knife toward the rootstock (not the bevelled side). This should be a very clean cut, so try to do this with one stroke of the knife. We suggest doing a few practice runs beforehand.
4. Cut the first inch of the bottom and top of the scion wood. These areas are prone to drying up.
5. Find the lower end of your scion wood. You will know what is the lower end because it’s the opposite end in which the buds are pointing. This is where you will make your first cut.
6. Make a cut on an angle that matches up with the cut that you’ve made on your rootstock.
7. Match up these cut surfaces, checking to make sure they are the same length. If held together, the cambium (green woody layers) should meet and the rootstock and scion will appear as one branch. Make any adjustments to your cuts if necessary. A small gap is acceptable, as we will be binding the two pieces.
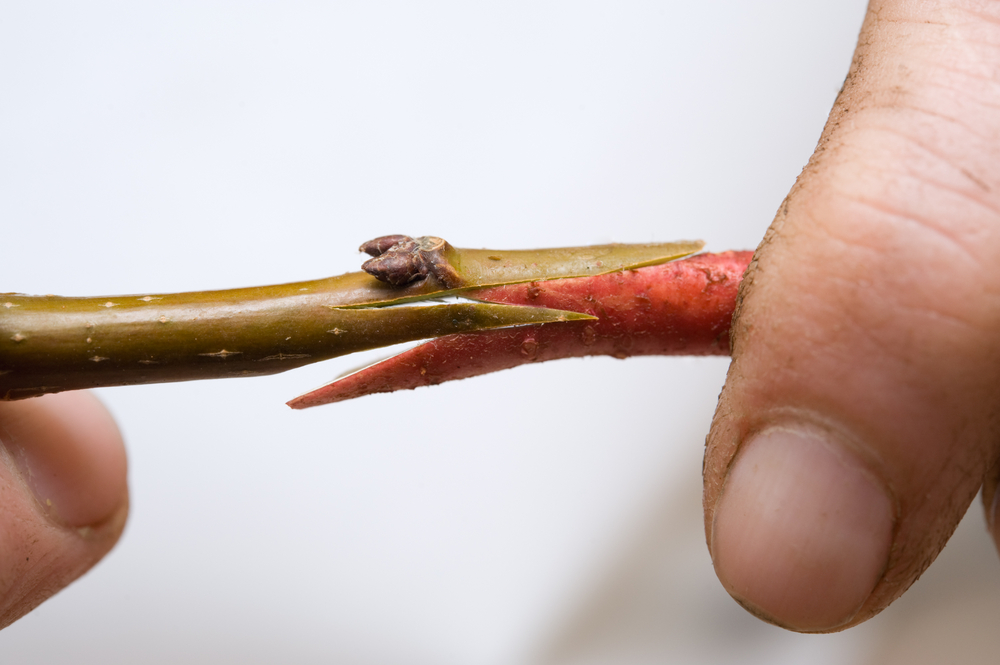
8. To make the “tongue” cut on your rootstock, start about one third of the the distance from the tip of where you just made your initial cut. Press the knife slowly in a downward rocking motion. What you’re making here is a little flap that will grab and interlock with a similar flap on your scion, kind of like a jigsaw puzzle. It should be about a half an inch to an inch deep. Do not push on the knife—you will slice your finger if you do.
9. Make the tongue cut on the scion the same way you did with the rootstock. Start about one third of the distance from the tip to the end of the cut and wiggle the knife down the wood until the cut is about half an inch to an inch deep.
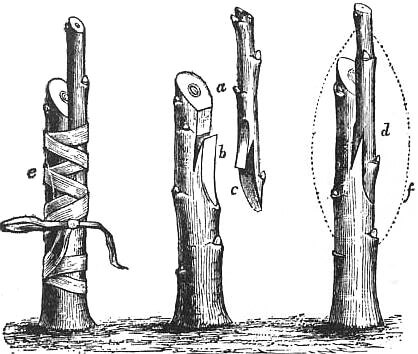
10. Flex the scion piece so that the gap between the tongues opens up. Line the cuts up, and slide them together, making sure to interlock the tongues. Make sure that the cambium layer is in contact with the other. (See the above diagram for some visual direction.)
11. It’s time to seal it up. You can use electrical tape, but choose a brand that is elastic and fully adhesive. You can also use grafting tape, which is designed to last long enough throughout the grafting process. Do not stretch this tape too tightly or it may crack. Make sure that there is no exposed cambium layer when you’re wrapping the branches up.
Aftercare
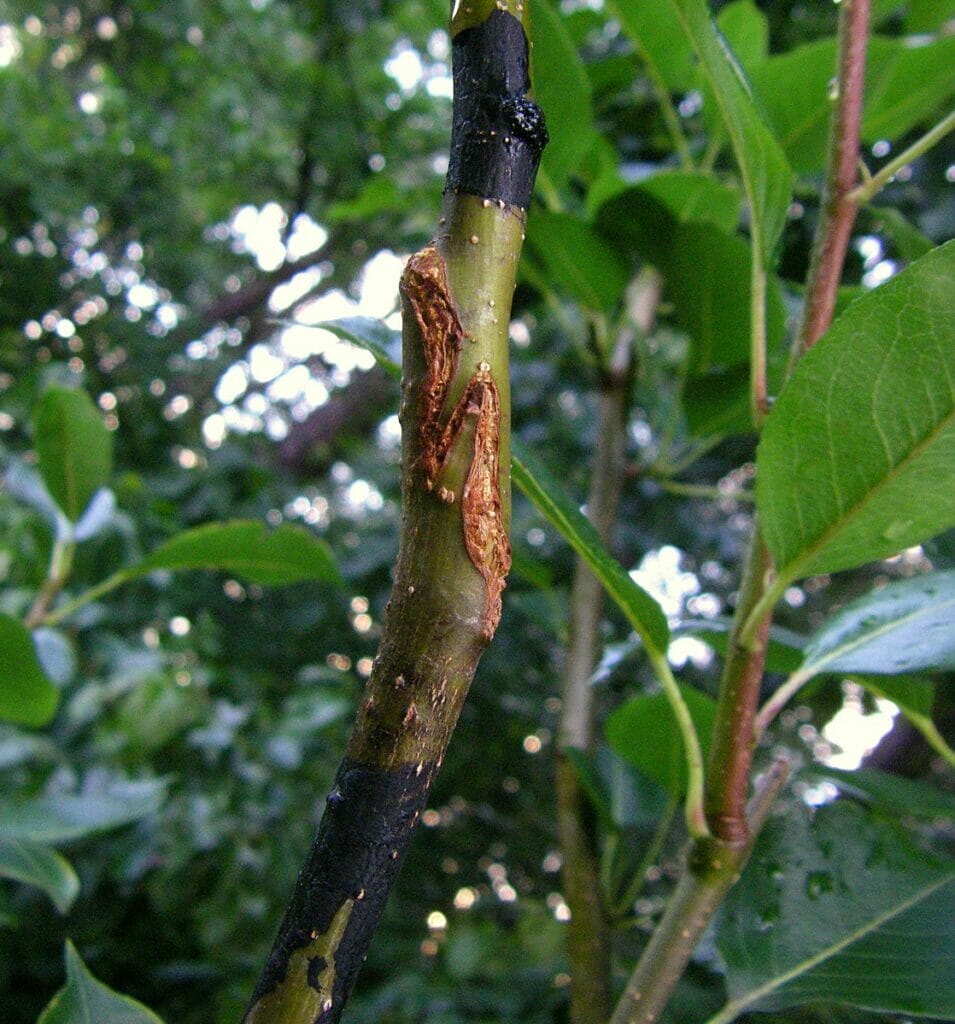
It can take anywhere from a few weeks to a few months for the grafting to heal and fuse. We suggest monitoring it every three to five days.
If you see rootstock growth below the graft, prune it off immediately with sterilized shears. This also includes anything around the base of your tree. By clipping this growth off, it ensures the energy is transported to the graft and not to the rootstock, so that the fusing between the two branches can be completed as quickly as possible.
You should also monitor new growth on the scion. The first sight of growth will mean the graft union is a success. However, your plant will still likely need the protection of whatever you’ve wrapped it with.
Once the scion grows and expands beyond the seal or wrap, growth may be restricted. If the seal is too tight or starts to crack, and you’ve confirmed that the scion has new growth, you can remove the seal.
We suggest waiting until fall to remove a protective barrier entirely, to prevent the bond from drying out. If the scion has outgrown its seal and it’s still summer, remove it and apply a new seal.
For the grafting to fuse and heal up, it can take three to eight weeks on average but sometimes longer depending on the type of tree. For it to actually sprout fruit, it takes one to four years on average.

Thanks for explaining this. One less “lost art.”
Where does one locate root stock?? 8ve never been able to find any here in CA