How to Build a Better Beehive
Take advantage of winter downtime and start your beekeeping venture now, before the pollinators become available for delivery in early spring.
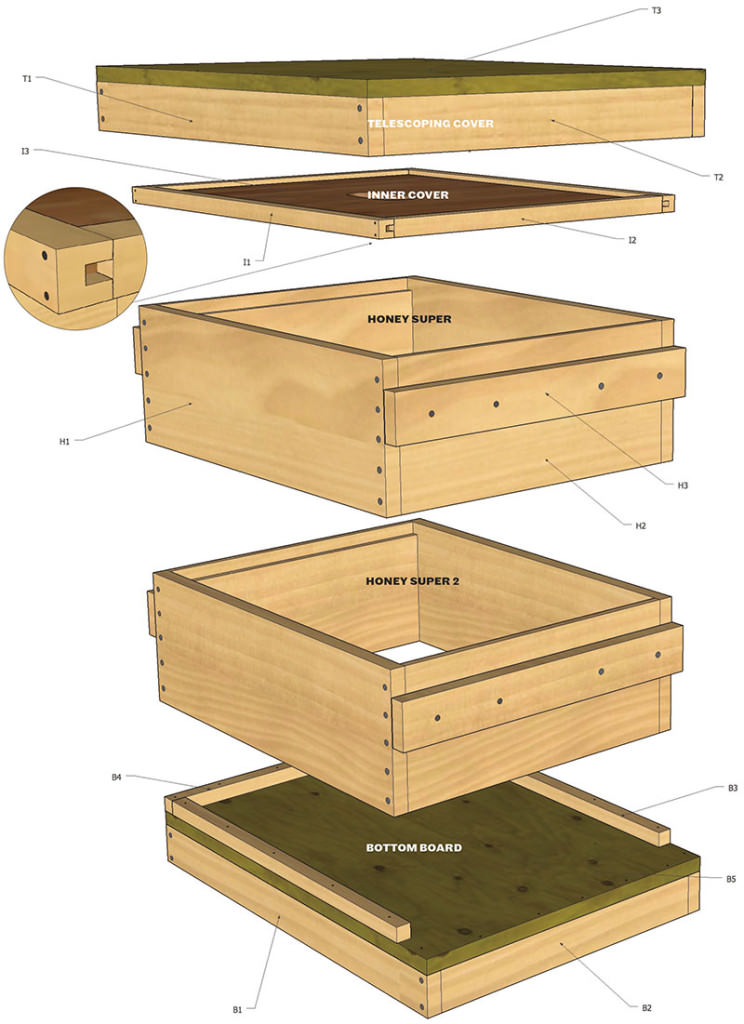
The directions below detail construction of the hive’s base and inner and outer covers, plus five supers for collecting honey. Come springtime, you’ll begin with two honey supers (each outfitted with 10 waxed frames), adding the remaining supers and frames as necessary to accommodate your bees’ rising comb production. Though optional, one coat each of primer and exterior paint will help your handiwork weather the elements. Just be sure to use a no-VOC formula and limit it to exterior surfaces only.
Tools and Materials
One 4′ x 2′ sheet of ¾”-thick plywood
One 2′ x 2′ sheet of ¼”-thick plywood
Four 8′-long pine 1x12s (¾” x 11¼”)
Tape measure
Table saw*
Chop saw*
Power drill with 3/32 and 5/32 bits
Hammer
1 lb. 2″ 6D galvanized nails
1 lb. 1¼” hardened trim nails
Waterproof wood glue
Jigsaw
40 #12 x 1¼” Phillipshead wood screws
Fifty 6¼” hive frames with wax foundation (from a beekeeping supplier such as dadant.com)
10-frame entrance reducer (from a beekeeping supplier such as dadant.com)
Cutting the Lumber
Use the table saw* to:
1. Cut the ¾”-thick plywood sheet into two pieces: one measuring 21¾” x 18¼” for the telescoping cover (T3), the other 22″ x 16¼” for the bottom board (B5).
2. Cut the ¼”-thick plywood sheet to 19 1/8″ x 15½” for the inner cover (I3).
3. Rip (cut lengthwise) each of the pine 1x12s into two pieces: one measuring 6 5/8″ wide, the other 4½” wide.
4. Rip one of the resulting 4½”-wide pine boards into three pieces: one measuring 2¼” wide, and two measuring ¾” wide. From each of the three remaining 4½”-wide pine boards, rip one 2″-wide board. (Discard scrap or save for later beekeeping projects.)
Use the chop saw* to:
1. Cut the 2¼”-wide pine board into two 21¾”-long pieces (T1) and two 16¾”-long pieces (T2).
2. Cut the ¾”-wide pine boards into two 19 7/8″ pieces (I1), two 14¾”-long pieces (I2), two 19 7/8″-long pieces (B3), and one 16¼”-long piece (B4).
3. Cut the 6 5/8″-wide pine boards into ten 19 7/8″-long pieces (H1) and ten 14¾”-long pieces (H2).
4. Cut the 2″-wide pine boards into ten 16¼”-long pieces (H3), two 22″-long pieces (B1), and two 14¾”-long pieces (B2).

Instructions
Make the telescoping cover. Align the T1 and T2 pieces specified in “Cutting the Lumber” to form a rectangle, sandwiching the shorter pieces (T2) inside the longer ones (T1). Using the power drill fitted with the ³/32” bit, drill 2 holes along the edges of the T1 pieces (as shown). Nail together using 8 of the galvanized nails. Attach the plywood telescoping cover (T3) to the top, using 20 of the trim nails.
Make the inner cover. Use the table saw* to make a 3/8“-deep by 1/4“-wide groove in the I1 and I2 pieces specified in “Cutting the Lumber.” Slide the 1/4“-thick plywood (I3) into that groove (as you would fit a pane of glass into a window). Ensure that I3 fits properly with the I1 and I2 pieces to form a perfectly flush frame. Then disassemble, glue the grooves, insert the plywood, and reassemble. Nail together using 8 of the trim nails, as shown. Using the jigsaw, cut a 31/4” by 11/4” oval in the center of the inner cover (for ventilation).
Make each honey super. Use the table saw* to cut a 5/8“-deep by 3/8“-wide notch out of 1 short side of each of the H2 pieces specified in “Cutting the Lumber.” (Ten hive frames will rest atop these notches inside each super when the hive is assembled.) Using the power drill fitted with the ³/32″ bit, drill 5 holes along the edges of the specified H1 pine pieces (as shown). Create a box by sandwiching the shorter pieces (H2) inside the longer pieces (H1). Glue the joints, then hammer a galvanized nail into each pre-drilled hole. Using the power drill fitted with the 5/32” bit, drill 4 holes along the length of each handle piece (H3), and attach to the supers using 4 of the screws on each side (as shown). Repeat these steps with the remaining specified pine pieces to make 4 more supers.
Make the bottom board. Align the B1 and B2 pieces specified in “Cutting the Lumber” to form a rectangle (as shown), sandwiching the shorter pieces (B2) inside the longer ones (B1). Using the power drill fitted with the 3/32” bit, drill 2 holes along the edges of the B1 pieces (as shown). Nail together using 8 of the galvanized nails. Attach the remaining 3/4” plywood piece (B5) to the top, using 20 of the trim nails (as shown). Align the B3 and B4 pine pieces atop the plywood and nail in place using 15 of the trim nails (as shown). This U-shaped platform will create a gap at the front of the hive, allowing bees to enter.
Assemble the hive. In each super, hang 10 frames with wax foundation from the notches you made. Stack the bottom board, 2 of the supers, the inner cover, and the telescoping cover. Insert the entrance reducer into the gap between the bottom board and the adjacent super (to discourage robbing by other bees and to control ventilation). As the season progresses, add more supers to the hive.
*Power saws can cause serious injury; please follow the safety instructions in your owner’s manual. Make sure to wear protective eyewear.
Follow us
This work is licensed under a Creative Commons Attribution-NoDerivatives 4.0 International License.
Want to republish a Modern Farmer story?
We are happy for Modern Farmer stories to be shared, and encourage you to republish our articles for your audience. When doing so, we ask that you follow these guidelines:
Please credit us and our writers
For the author byline, please use “Author Name, Modern Farmer.” At the top of our stories, if on the web, please include this text and link: “This story was originally published by Modern Farmer.”
Please make sure to include a link back to either our home page or the article URL.
At the bottom of the story, please include the following text:
“Modern Farmer is a nonprofit initiative dedicated to raising awareness and catalyzing action at the intersection of food, agriculture, and society. Read more at <link>Modern Farmer</link>.”
Use our widget
We’d like to be able to track our stories, so we ask that if you republish our content, you do so using our widget (located on the left hand side of the article). The HTML code has a built-in tracker that tells us the data and domain where the story was published, as well as view counts.
Check the image requirements
It’s your responsibility to confirm you're licensed to republish images in our articles. Some images, such as those from commercial providers, don't allow their images to be republished without permission or payment. Copyright terms are generally listed in the image caption and attribution. You are welcome to omit our images or substitute with your own. Charts and interactive graphics follow the same rules.
Don’t change too much. Or, ask us first.
Articles must be republished in their entirety. It’s okay to change references to time (“today” to “yesterday”) or location (“Iowa City, IA” to “here”). But please keep everything else the same.
If you feel strongly that a more material edit needs to be made, get in touch with us at [email protected]. We’re happy to discuss it with the original author, but we must have prior approval for changes before publication.
Special cases
Extracts. You may run the first few lines or paragraphs of the article and then say: “Read the full article at Modern Farmer” with a link back to the original article.
Quotes. You may quote authors provided you include a link back to the article URL.
Translations. These require writer approval. To inquire about translation of a Modern Farmer article, contact us at [email protected]
Signed consent / copyright release forms. These are not required, provided you are following these guidelines.
Print. Articles can be republished in print under these same rules, with the exception that you do not need to include the links.
Tag us
When sharing the story on social media, please tag us using the following: - Twitter (@ModFarm) - Facebook (@ModernFarmerMedia) - Instagram (@modfarm)
Use our content respectfully
Modern Farmer is a nonprofit and as such we share our content for free and in good faith in order to reach new audiences. Respectfully,
No selling ads against our stories. It’s okay to put our stories on pages with ads.
Don’t republish our material wholesale, or automatically; you need to select stories to be republished individually.
You have no rights to sell, license, syndicate, or otherwise represent yourself as the authorized owner of our material to any third parties. This means that you cannot actively publish or submit our work for syndication to third party platforms or apps like Apple News or Google News. We understand that publishers cannot fully control when certain third parties automatically summarize or crawl content from publishers’ own sites.
Keep in touch
We want to hear from you if you love Modern Farmer content, have a collaboration idea, or anything else to share. As a nonprofit outlet, we work in service of our community and are always open to comments, feedback, and ideas. Contact us at [email protected].by Cam Pauli, Modern Farmer
January 14, 2016
Modern Farmer Weekly
Solutions Hub
Innovations, ideas and inspiration. Actionable solutions for a resilient food system.
ExploreExplore other topics
Share With Us
We want to hear from Modern Farmer readers who have thoughtful commentary, actionable solutions, or helpful ideas to share.
SubmitNecessary cookies are absolutely essential for the website to function properly. This category only includes cookies that ensures basic functionalities and security features of the website. These cookies do not store any personal information.
Any cookies that may not be particularly necessary for the website to function and are used specifically to collect user personal data via analytics, ads, other embedded contents are termed as non-necessary cookies.

Can you give us a better view of the beehive because I can’t see really well?
I love this …
I love this…
I am very interested in starting a colony of bees. As a retired environmental civil designer, I want to continue the honey bee species here in Massachusetts.I love what they produce and contribute to our eco system I have the time and ambition but I need some basic instruction to set the wheels in motion. A good informative book is a good start for me,can you assist me?
I love this …