How to Store Root Crops for Winter
By Brian Barth
on August 20, 2015
One of the greatest challenges of gardening has nothing to do with growing crops—it’s making use of all the food you grow before it goes bad. After laboring all summer to produce a bountiful harvest, now is time to figure out how to preserve your harvest for the lean months ahead.
Canning, drying and freezing works for many vegetables, but root crops are best preserved ‘as-is’ in a cool, humid place. Now that root cellars are largely a thing of the past, a bit of improvisation may be in order.
[mf_h2 align=”left” transform=”uppercase”]The Ideal Climate for Roots[/mf_h2]
Root vegetables keep for months if the conditions are right. Between 32 and 40 degrees Fahrenheit with 95-percent humidity keeps them crisp and fresh – exactly why the refrigerator was invented. Root vegetables aren’t very tasty once frozen and they start to sprout (and rot) when temperatures rise above 40 degrees or so. Low humidity causes them to dry out and shrivel up.
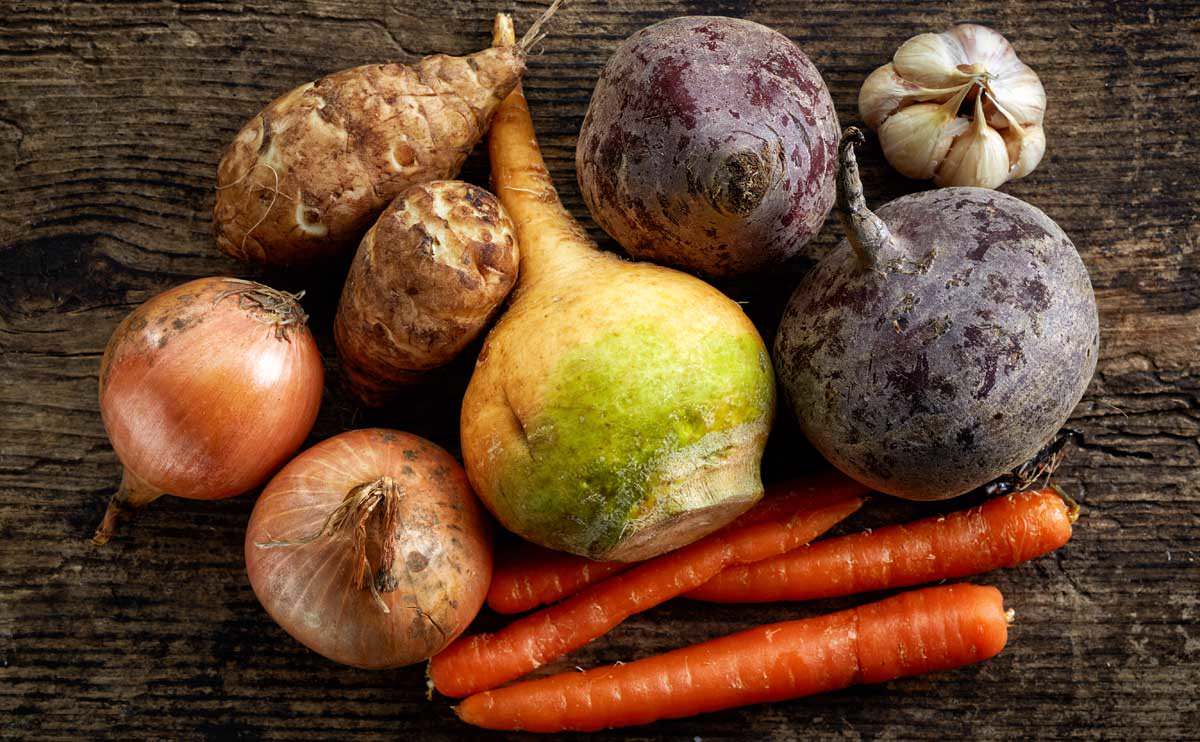
[mf_list_sidebar layout=”basic” bordertop=”yes” title=”Shelf Life of Root Vegetables” aftertitle=”These are dependent on ideal storage conditions of 32 to 40 degrees Fahrenheit and 95-percent humidity.” separator=”no”]Beets
1-3 months
Carrots
4-6 months
Celeriac
3-4 months
Horseradish
10-12 months
Jerusalem Artichokes
2-5 months
Kohlrabi
2-4 weeks
Parsnips
2-6 months
Potatoes
5-8 months
Rutabagas
2-4 months
Turnips
4-5 months
Adapted from the University of Wisconsin Cooperative Extension
[/mf_list_sidebar]
But since you can’t cram a winter’s worth of produce in your fridge, there are other ways to provide ideal storage conditions. The goal is to insulate the storage space as much as possible to guard against fluctuations in temperature and humidity. Exactly how you do that depends on the climate where you live and the resources you have available.
[mf_h2 align=”left” transform=”uppercase”]Basements and Boxes[/mf_h2]
In northern climates, most houses have a basement. If the basement is unfinished (i.e. no heating system), it’s likely to remain cool, but above freezing through the fall and winter – which means it is already a close approximation of a root cellar.
One approach to enhancing a basement’s capacity for storing root crops is to build an insulated closet in a corner where there is foundation window. The ideal temperature can be maintained by opening and closing the window – if it’s too warm, let some cold air in from outside. Humidity is controlled by leaving a pan of water on the floor to slowly evaporate. The roots can be spread out on wooden shelves, making it easy to go in and grab them when needed. You’ll need a reliable thermometer and hygrometer (a tool that measures humidity) to keep the climate fine-tuned.
If building an insulated closet just isn’t on your to-do list this year, wooden crates, plastic totes, coolers, and cardboard boxes are all viable substitutions for storing root crops in a basement. The sides, top, and bottom of the container should be lined with an insulating material (the thicker, the better) with the roots placed in the middle. Peat moss is ideal because it self-regulates the humidity level in the container – it will absorb moisture given off by the produce when it gets too dank and gives the moisture back if the roots become too dry. For best results, moisten the peat moss slightly and spread a layer of it between each layer of roots. If coolers, plastic totes, or other air tight containers are used, leave the lid open and cover the top with peat moss so the roots can breathe – otherwise, they are more likely to rot.
Take roots from the container as you need them throughout the fall and winter (and even into the following spring, if they last). Whenever you remove some for cooking, check to see if any are rotting and remove those, too.
[mf_h2 align=”left” transform=”uppercase”]Non-Basement Options[/mf_h2]
If you lack a basement, put root crop storage boxes in your crawlspace, garage, mudroom, under the back porch, or anywhere else that stays cool, but doesn’t experience deep freezes. The insulation in the box will keep the veggies from freezing in sub-freezing weather, but only to a point. Ultimately, this is a function of climate, so finding the right place to store your roots may be a matter of experimentation – buy a few thermometers and leave them in potential storage areas to see which has the least temperature fluctuation.
Another option is to dig a pit in a shady area – essentially a mini-root cellar. Because of the thermal properties of soil, the deeper you go below the surface, the more temperatures resemble that of a refrigerator, year-round. In climates where the ground freezes in winter, the pit needs to be deep enough for the roots to be below the freeze line, which can be two feet or more below the surface in the coldest climates (ask your neighbors if you don’t know the typical depth of frozen soil in your area). Use rigid plastic bins or other rodent proof containers to store the roots inside the pit. Cover the top with a wire mesh to exclude rodents from above, fill the remainder of the pit with peat moss, and cover the hole with a piece of plywood.
In climates where the ground doesn’t freeze, it may work to leave the roots in the ground where they were grown and harvest them as needed. (Though rodents may show up to eat the roots before you do.) To prevent damage from the occasional frost, cover the roots with a six-inch layer of straw. They will rot if they’re surrounded by heavy wet soil, but this technique works in well-drained raised beds in California and the Deep South. You can cover the beds with plastic to shield them from winter rains.
[mf_h2 align=”left” transform=”uppercase”]Preparing Roots for Storage[/mf_h2]
When your root crops are ready for harvest, there are a few simple steps to ensure they last as long as possible in storage.
I’m in Zone 3 and my carrots are still in the ground which is still wet and we’re expecting more rain today. We’ve heard that storing them in dry sand in the garage or basement is a good method here. The garage is uninsulated and the basement doesn’t get below 60F.
May I get your advice please?